Pre Production:
As of Monday October 1st 2013 you have 32 weeks to complete your film. It sounds like a lot of time but believe in me it will fly by. I can only describe the entire year is more of a marathon than a sprint but I urge you to sprint during pre-production. Hopefully you have gotten more than the bare minimum done for you research and development stage. As mentioned you should aim to start the academic year with the following as the absolute bare minimum:
- Core team
- Script (at least draft 5)
- Synopsis and tagline
- Production Schedule
Compress pre-production. You will be given 10 weeks, the entire 1st semester but you don't have this amount of time to play with in reality. Thats why you will need to get started over the summer and let the 1st half of the1st semester be an extension of that. This put more stress into at the start than at the end of the project but will give you breathing room in production. Our course tends to spend too much time in pre-production and there were some people doing pre-production work in the final week of the project. Don't be this person.
Be realistic. Its vitally important that you are realistic about what you making. There are always simpler ways to tell stories, solve problems.
Production Design & Visual Development
Make sure you get a good production designer. You should be able to identify who is best for this position and it may not even be the director. There job is not to apply their own style to the films but to work closely with the director to find the "look" of the film and guide the visual development artists towards that vision. I stumbled upon this gem of a video of DreamWorks Production Designer Kathy Alteri. Its give you a rough ideas of the jobs and how she works with vis dev artists.
Visual Development
What We Did Right:
- Research & Reference. Long before I was involved Freddy, Seb and Luke went out on a fishing boat and took load of detailed photographs. Visual development artists would use these
- Not defining look for environment (spending too much time on characters/ props)
- Not developing a full colour script (no colour script not lighting)
What I would do next time:
Consult CG Supervisor on how final artwork should be provided. For example Autosdesk Maya prefers square images for the image plane so provide them square for the CG Supervisor/ Maya Modeller.
Resource:
Living Line Library: http://livlily.blogspot.co.uk/2010/11/model-sheets-production-drawings.html
Pintrest Character Reference: http://pinterest.com/characterdesigh/
Character Design:
What We Did Right:
- Producing load of concepts before choosing one to develop.
- Defining height of characters before modelling started. (working to real world scale)
What we Did Wrong:
- Not a wide enough range of styles of characters.
- Not informing everyone it would affect down the line when design changes are made.
What I Would Do Next Time:
- Make mood boards for each characters, environments and key storytelling props
- Have visual development artists do a load of sketches and turnarounds in various styles.
- Ensure your character sheets are consistent.
Other Advice:
Facial expressions, key poses, character line ups. These will help everyone in production further down the line. Modellers will need lineups for size reference, riggers and animators will need to ensure they can hit all the face expressions and poses.
Know the heights of the characters. This will help you with lineup and ultimately when they are modeller they will be built to real scale this information will be passes onto the modeller at some point.
Aim to start character models as soon as possible. if you start term on the 1st October your character rigs should be complete before christmas.
Get final concept art of characters worked up. Like the one below this gives a good indication of the look we are aiming to get from our renders.

Environments & Backgrounds:
What We Did Right:
- Creating mood boards.
- Getting several concept examples worked up by Phoebe.
What we Did Wrong:
- Underestimated the complexities of setting a CGI film at sea.
- Not testing the sea and water simulations at research and development stage.
- Not defining the look of the sea and sky earlier in production, too much focus on boat and characters.
- Not set a student film at sea or...
- Test water simulations earlier.
Other Advice:
Create a detailed environment/ background lists. This will be signed off as environments and background go through design and modelling through to lighting and look development.
Create an ariel/ plan view of each scene. Note the time, date, position of the characters, movement, camera placement, location of props and fixtures and lighting.
Where is the light coming from? This is an important questions especially for CGI films. Make a note of anything that gives off light; windows, skylights, lamps, torches, a glow from the TV/ computer screen, reflection in mirrors, glasses and or in puddles after the rain, a living room fire place, matches, cigarettes or lighters illuminating a characters face, etc. All this will help to build the world (mis-en-scene), inform the colour script and give lighting artists more to work with in production.


Props & Fixtures:
What We Did Right:
- Detailed prop lists based on animatic with name of; designers, modeller, texture artists, etc.
- Marking "storytelling props" (key to narrative) in red and "non storytelling props" in black.
- Getting "storytelling props" designed first. Other props would be made if we had time.
- Due to lack of some "non storytelling props" were modelled first. We deviated from initial plan to model "storytelling props" first because we could not settles on the designs of the ones we needed.
- Make prop lists and stick to creating "storytelling props" first.
- Consider weather the other props are necessary at all.
- Make mood boards for key story props especially if director does not know what they want.
If you know props are not important then consider scrapping them. We spent a lot having viz dev artists design knifes and pipes. After long and arduous feedback over several weeks the knife became a rusty machete based on a photography from a google search and the pipe was scrapped from the story because of the logistic of animating lip sync with the pipe in the mouth, which I can only assume would have needed to be a part of the Fisherman character rig.
 |
| Mood board/ reference for the fishing boat from Freddy Pooley & Luke Ridgeway. |
 |
| A photograph of a cardboard boat model was taken. Phoebe Herring painted over a the photo in Photoshop. The emphasis her was on the look of the water. |
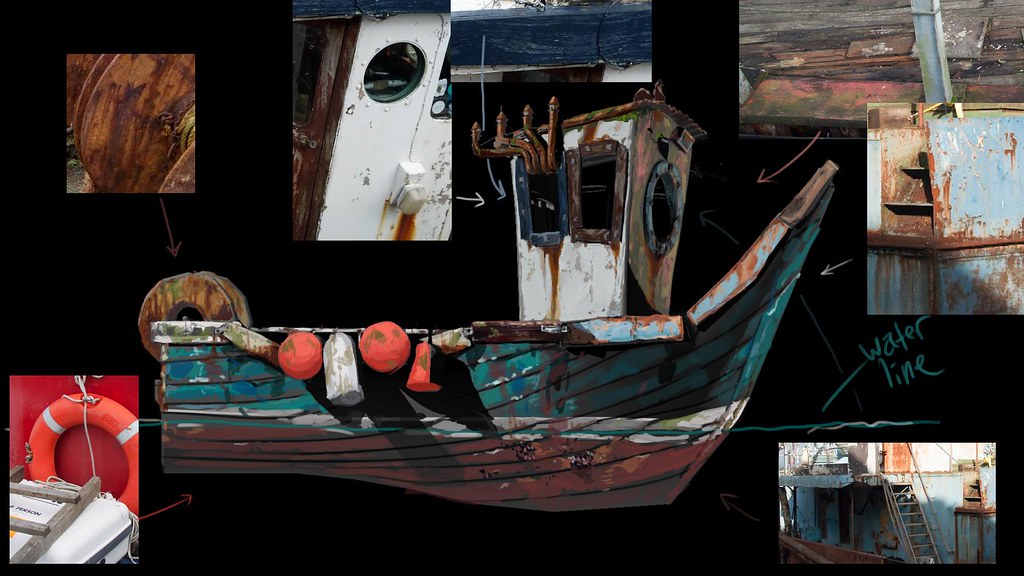 |
| A side view of the boat model was rendered and sent to Visual Development artists. Phoebe Herring painted over it in photoshop referencing photos taken during research & development. |
Storyboards:
What We Did wrong:
- Not storyboarding properly (seriously..?).
- Jumping strait into CGI to place cameras (seriously)
- No making note of those camera positions (they had to be re-positioned for previz/ animatic
- Not showing storyboards to other students and lecturers for feedback.
- Storyboard the hell out of the film.
- Get a dedicated story/ storyboard artists (not necessarily the director)
- Get a dedicated story/ storyboard artists who tough/ has balls of steel
- Lock storyboards as early as possible and move into animatic (story should be solid at this point)
- Get them into Toon Boom Storyboard Pro as soon as possible
- Producer will need to make tweaks to the schedule one the scoreboards are locked
One of my biggest regrets is not having freddy and luke storyboard the early stages of the project. We jumped strait to animatic which I something we should not have let slip though the cracks. I'll explain this in more details in the Animatic section below.
Don't just change the story every time you get feedback. There is the tendency to completely change some sequences. While you think you are solving problems you end up adding new ones. Spend some time playing with staging, composition and camera angles of sequences people do not understand to help the story read better.
Stick it up in the studio for everyone to see and invite criticism. This is one of the benefits of working physically over digital. People can see the story by chance and offer their opinion.
Storyboard Resources:
Temple of the Seven Camels: http://sevencamels.blogspot.co.uk/
Karen J Lloyd's Storyboard Blog: http://karenjlloyd.com/blog/
Animatic:
What We Did Right:
- Getting sound effects on animatic early to help it read better. (thank you Ben Wardle!)
- Getting a very good editor to cut the crap.
- Getting one new animatic out per week.
- Putting sound effects on early to help it read better.
- Not storyboarding (seriously..?)
- Jumping strait into CGI to place cameras (yep seriously)
- No making note of those camera positions (they had to be re-positioned for previz/ animatic
- Not showing storyboards to other projects and lecturers
- Storyboard the hell out of the film before moving into animatic.
- Get a dedicated story/ storyboard artists (not necessarily the director)
- Get them into storyboard pro as soon as possible
- Be absolutely ruthless and cut shots if the director can't see it needs to go (producer/ editor)
- Lock the animatic as soon as possible.
- If you are using motion capture work towards a recording of the actors first.
Other Advice:
The early stages of our animatic process were very convoluted as it was the first time some of them team had worked on an animatic that would be dine in fully CGI. It involved placing camera, posing characters who's rigs were not finished. The problem was that the camera position was not documented which would mean for the final animation the cameras, and characters would have to re-referenced.
Find a musician/ composer and sound effects design. The sooner you get them on board the better. Audio helps a rough animatic read so much better.The early stages of our animatic process were very convoluted as it was the first time some of them team had worked on an animatic that would be dine in fully CGI. It involved placing camera, posing characters who's rigs were not finished. The problem was that the camera position was not documented which would mean for the final animation the cameras, and characters would have to re-referenced.
use thick outline for close objects, thin for backgrounds
Work in greyscale but add colour to accent certain objects or moments. Similarly if you are mixing 2D and CGI maybe colour code whats will be 2D and CGI and make sure everyone understands. This was CG Supervisor and Production Designer can discuss needs to be modelled and and what can be a digital painting.
Add a shot and frame count on every version of animatic. Its a given that the production will be "shot driven" and this will help producer and CG Supervisor who will work on the shot schedule.
Update the shot schedule for each new version of the animatic.
Accept will take a very long time to get the animatic right. It will be built and destroyed over and over.
Get fresh eyes on the animatic. Through the year get fresh eyes on the animatic. Don't expect lecturers to do this for you. One of the problems with our weeklies is that we were all a little bit too nice on each other. Find people who will be honest and have an opinion on your work.
Give and ask for constructive criticism. We didn't say much about others animatics because we were nervous about our own. This leaves on the opinions of our lecturers who won't want to too harsh so they'll use the old "sandwich" method (say some thing nice, followed by several harsh and inconvenient truths, toped with something nice.) Get used to this. My advice to you is to to critique and help each other each week you will all be better for it. Have a opinion on each others work and help them make it better. Yes you are in competition with each other up until the pitch stages but in the even your project does not get though its in your best interest to make sure whats being done is
Know what the core of your story idea is. Back in my blog post on development I wrote about knowing what it is you are prepared to leave and what you have to fight for. This will be important when you show it to others as they will pull it apart. This was the problem with or it Orbit Strange. What will help is having a piece of concept art based on "the key moment" you are building up to in your movie weather that is hitting an emotional beat or an epic set piece. If what comes before is not building up and what comes after is not a consequence then you can afford to let it go.
Production Management & Scheduling:
Once you have your storyboard and animatics coming out regularly ensure all production documents are updated accordingly. Production Schedule, Shot Schedule, Prop, Model and Environment Sign-off sheet. Be sure to schedule time for schedule time for R&D especially for CGI, Motion Capture and Stereoscopic 3D projects. I feel this is one of the things we neglected early on.
If you know you are using motion capture then visit Jens Meisner who works in the Motion Capture studios in the Performance Centre, be sure to factor in time for motion capture rehearsals (, motion capture recordings.
If you know you are using stereoscopic 3D (S3D) then visit ___ who works in the AIR Building. He can give you access to the large S3D screens for you to have stereo dailies/ weeklies on. You will need to look at S3D on a large screen as it will feel different to a smaller screen.
You can't know everything either. Another mistake I made was trying to make the schedule by myself. Instead ask people how long it will take and discuss time for flexibility. The reason you need to discuss this is that they will either factor in extra time when they give you the estimate or you will afterwards so make sure you discuss it.
Color Script:


Music/ Composer:
Music can do some of the heaviest lifting for an animation especially if there is not much dialogue.
What We Did Right:
Make a Musicians/ Composers pack. You have ben working on your project for a few months by the time you bring in a musician/ composer but to the outside world they have no idea what your show is about. Put together a pack for the musician composer to get them up to speed. The great thing is that you have most of this ready from development. Well you should have.
If the actor is not hitting the right emotional beat the director can try a few different techniques to steer them in the right direction; ask them questions.
If you are the producer, or you re in the room while the recording is being done encourage the actor and director to give their all.
Do as many takes as you need to
Marketing & Promotional Ideas:
During pre-production a good exercise is to sketch out potential ideas for posters and dvd cover. This will get you thinking about what the idea is it as its core. I did this more for another project called Little Loud I was developing before I jumped onto Hook, Line & Stinker.
During this process you must develop the following.
Even though you will not be able to execute these ideas until later in production such as posters that need to be rendered you need to think about them now because...
You will want these for:
You can see some overused movie poster cliches here: http://imgur.com/gallery/jrmWj
Pre-Prodcution / Fun Pack:
At the end of pre-production you should have the following to hand in.
Development:
Thank you for reading the third part. Please read "Pipeline Planning & Asset Management" here.
Get fresh eyes on the animatic. Through the year get fresh eyes on the animatic. Don't expect lecturers to do this for you. One of the problems with our weeklies is that we were all a little bit too nice on each other. Find people who will be honest and have an opinion on your work.
Give and ask for constructive criticism. We didn't say much about others animatics because we were nervous about our own. This leaves on the opinions of our lecturers who won't want to too harsh so they'll use the old "sandwich" method (say some thing nice, followed by several harsh and inconvenient truths, toped with something nice.) Get used to this. My advice to you is to to critique and help each other each week you will all be better for it. Have a opinion on each others work and help them make it better. Yes you are in competition with each other up until the pitch stages but in the even your project does not get though its in your best interest to make sure whats being done is
Know what the core of your story idea is. Back in my blog post on development I wrote about knowing what it is you are prepared to leave and what you have to fight for. This will be important when you show it to others as they will pull it apart. This was the problem with or it Orbit Strange. What will help is having a piece of concept art based on "the key moment" you are building up to in your movie weather that is hitting an emotional beat or an epic set piece. If what comes before is not building up and what comes after is not a consequence then you can afford to let it go.
Production Management & Scheduling:
Once you have your storyboard and animatics coming out regularly ensure all production documents are updated accordingly. Production Schedule, Shot Schedule, Prop, Model and Environment Sign-off sheet. Be sure to schedule time for schedule time for R&D especially for CGI, Motion Capture and Stereoscopic 3D projects. I feel this is one of the things we neglected early on.
If you know you are using motion capture then visit Jens Meisner who works in the Motion Capture studios in the Performance Centre, be sure to factor in time for motion capture rehearsals (, motion capture recordings.
If you know you are using stereoscopic 3D (S3D) then visit ___ who works in the AIR Building. He can give you access to the large S3D screens for you to have stereo dailies/ weeklies on. You will need to look at S3D on a large screen as it will feel different to a smaller screen.
You can't know everything either. Another mistake I made was trying to make the schedule by myself. Instead ask people how long it will take and discuss time for flexibility. The reason you need to discuss this is that they will either factor in extra time when they give you the estimate or you will afterwards so make sure you discuss it.
Color Script:
Music can do some of the heaviest lifting for an animation especially if there is not much dialogue.
What We Did Right:
- tried to find a musician early (at tis stage we were still working out story so this was tricky)
- sending them a locked version of the animatic/ previz
- talent scouting from university talent and national talent.
- Director has a clear vision for the music.
- using someone from the music course that can come is on campus and can come into the studio
- Made sure the music did not dip and in and out between dialogue. Constant volume.
- Not giving the musician enough tim to compose. Composer had 6 weeks before the deadline.
- Not updating musician on new versions of animatic.
- Slow communication during deadline because of focus on shots over music.
- find a roaster of musician early in the year keep them updated so they feel more involved in process (do this early in the year).
- prepare music examples to send to musician long before you need them (director)
- if there is anything that needs emphasis them let them know is
- have faith in the musicians/ composers ability to find the story don't try to scrap them if they first version is not right, chances are the director gave bad direction.
Make a Musicians/ Composers pack. You have ben working on your project for a few months by the time you bring in a musician/ composer but to the outside world they have no idea what your show is about. Put together a pack for the musician composer to get them up to speed. The great thing is that you have most of this ready from development. Well you should have.
- script, treatment, synopsis, tagline.
- Crew/ team. Provide contact details for Director, Producer, Editor.
- animatic. Provide two versions. Both with dialogue. One with and one without and SFX.
- character profile sheets with biographies and concept art.
- examples of what director does and does not want.
- meeting dates (keep consistent).
- music deadline (this will need to be negotiated.)
- project deadline.
- (ask them if they need anything else to play their part.)
If the actor is not hitting the right emotional beat the director can try a few different techniques to steer them in the right direction; ask them questions.
If you are the producer, or you re in the room while the recording is being done encourage the actor and director to give their all.
Do as many takes as you need to
Marketing & Promotional Ideas:
During pre-production a good exercise is to sketch out potential ideas for posters and dvd cover. This will get you thinking about what the idea is it as its core. I did this more for another project called Little Loud I was developing before I jumped onto Hook, Line & Stinker.
During this process you must develop the following.
- Logo.
- Typeface/ font.
- Posters (portrait & landscape)
- DVD cover (front & back)
Even though you will not be able to execute these ideas until later in production such as posters that need to be rendered you need to think about them now because...
- It will help you sum up the die.
- Provide you with a solid brand identity for the
You will want these for:
- Blogs (your own and blogs that promote animated films)
- Websites (for the cover of your portfolio.)
- Film Festival Press Packs (to send to festivals so they can talk about your film.
 |
| Hook, Line & Stinker DVD Front & Back cover. Character posed by Luke Ridgeway. Lighting, Rendering, Compositing by Omari McCarthy. Design and Layout by Stu Whitten. |
Pre-Prodcution / Fun Pack:
At the end of pre-production you should have the following to hand in.
Development:
- Script, Tagline, Synopsis
- Team/ Roles
- Production Schedules
- Shot Schedule
- Model Sign-off Sheet
- Prop Sign-off Sheet
- Environment Sign-off Sheet
- Character Turnarounds
- Character Expressions
- Character Poses
- Character Concept Art
- Character Lineups (with hight in metres if using Maya)
- Environment Plan / Ariel View (with measurement)
- Environment Concept Art
- Prop Turnarounds (with measurements)
- Storyboard(s)
- Animatic(s)
- Color Script(s)
- Style frame (concept art demonstrating exact "look" you are aiming for.)
- Posters in portrait & landscape (several variations).
- DVD case (front & back with synopsis).
Production, Research & Design:
documentation; for Ptex texture workflow
rig tests with animation.
texture and lighting tests matching concept art (even if its just on spheres)
Documentation for Ptex texture workflow
simulations tests